Need More Help?

For IT support, visit the IT Service Centre or dial 55255 from a College phone.


Versions Compared

Key

  • This line was added.
  • This line was removed.
  • Formatting was changed.


Info
iconfalse

This article outlines general access and basic functionality of Selkirk College email using Outlook on the web for O365. 

Note: Staff transition is slated for February 13th, 2021.  For more information on the implementation plan, visit Office 365 Migration.


Expand
titleSigning in


Panel
bgColor#FAFAFA

Signing in to Outlook on the Web

  1. Open a web browser to the Outlook Sign in page (https://outlook.selkirk.ca).

    Note
    titleIf You See This Screen


    If you see the above screen when trying to sign in, you are probably logged in to another Microsoft Service.  To bypass the automatic login, you can start a Private Window (Firefox) or Incognito (Chrome) session to see the login screen in step 2.


  2. Sign in:

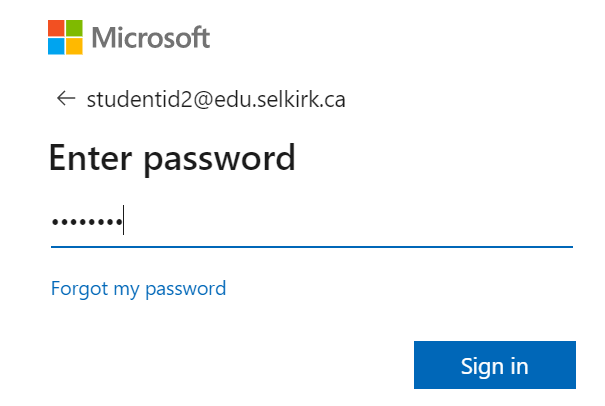
    1. Enter your college username (email address) and password.

    2. Click "Next".

  3. Select No on the Microsoft sign in screen to stay logged in.


  4. You're done!


Expand
titleAdding Outlook Email To Your Mobile Devices

From your Outlook on the Web Email Inbox (on first login):

  1. Open a web browser to the Outlook Sign in page (http://outlook.selkirk.ca).

  2. Sign in using your college username (email address) and password.

  3. Under "Get started", click on "Get Outlook mobile".


    Warning

    NOTE: Once you click a topic or the "X" at the top within the "Get Started box", the topic/box will disappear. 

    To install the mobile app after your first login, visit Using Mobile Devices with Outlook 365 Email and follow the instructions respective to your mobile device.


  4. Enter your mobile number OR scan the QR code, then follow the prompts provided.


Expand
titleEmail


Horizontal Navigation Bar
idO365
titleClick for more information.
classtab-header


Horizontal Navigation Bar Page
titleCreate a new email
classtab-button-content

Create a new email message

  1. At the top of the page, select +New message.

  2. On the To line, enter the name or email address of the person who will receive the message.

    Tip

    Note: When composing a new email message, some users won’t see their list of contacts if they click the To or Cc buttons. This is a known issue. To see names to select, start typing on the To or Cc line. Your relevant contacts will appear.  


  3. On the Add a subject line, enter a brief description of what your message is about.

  4. To attach a file to your message, select Attach.

    • For more information about attaching files to your message, see Attach files .

  5. Type your message and then select Send.


Horizontal Navigation Bar Page
titleDelayed send
classtab-button-content

Schedule an email for delayed send

This feature enables you to defer sending an email and choose the date and time your email message is sent.

  1. Compose your email as normal.

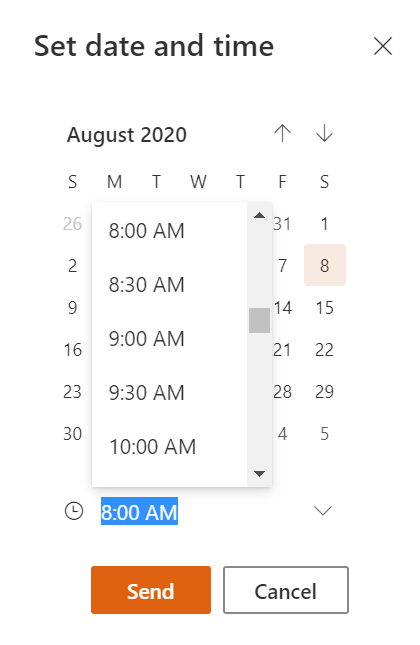
  2. At the bottom of the message box, select press the dropdown icon (Message actions) beside "Send", then select "Send later".


  3. Choose the date and time when you want to schedule the message to be sent.

    Tip
    titleNotes:
    • The message will remain in your Drafts or Sent Items folder until it is due to be sent. You can edit or delete it at any time until it's due to be sent. After editing, you must select Send > Send later again.

    • You do not need to be online when the message is scheduled to be sent.


  4. Select Send.


Horizontal Navigation Bar Page
titleForward
classtab-button-content

Forward an email message

Tip

Note: You can forward only one message at a time.

  1. In your message list, choose the message that you want to forward.

  2. At the top right corner of the message pane, select Forward.


  3. Type your message and then select Send.


Horizontal Navigation Bar Page
titleReply
classtab-button-content

Reply to an email message

  1. In your message list, choose the message that you want to reply to.

  2. At the top right corner of the message pane, select Reply (Reply) or Reply all (Reply all). 


  3. Type your response and then select Send.

    Tip

    Note: By default, the original email and its history will not be displayed when you're replying to a message. To show the original email or change the email subject, select Show message history at the bottom of the message pane.


Horizontal Navigation Bar Page
titleUsing Cc or Bcc
classtab-button-content

Add recipients to the Cc or Bcc lines


To add recipients to the Cc or Bcc lines, select Cc or Bcc on the right side of the To line.

Tip

Note: The names of people on the Bcc line are hidden from other recipients of the message.


Horizontal Navigation Bar Page
titleSave draft
classtab-button-content

Save email as a draft

  1. To save a draft email for future sending, click on the "..." buttons to the far right at  the bottom of the message, select Save draft.


  2. The message will be saved in your drafts folder, located in the left hand column.


Expand
titleCalendar


Horizontal Navigation Bar
titleClick for more information.
classtab-header


Horizontal Navigation Bar Page
titleCreate a meeting or appointment
classtab-button-content

Create a meeting or appointment

An appointment is an event for yourself like a lunch date or medical appointment. A meeting is an event that you send to other people.

  1. At the bottom of the page, select Calendar .

  2. Double-click on the calendar date when you'd like the event to occur OR select New event at the top of the page.

  3. Add a title to your event.

  4. Set the start and end date of the event. If it's an all-day event, select the All day toggle.

  5. If you want to invite people to the event, type their names or email addresses in the Invite required attendees box. If they are also Outlook calendar users, you can see times they're available below the drop-down menus for date and time.

    A screenshot of times when a meeting invitee is available

  6. The Search for a room or location function will not work with the College's system. To find an available meeting space, visit https://erp.selkirk.ca/srs/findroom.htm or visit the Welcome Centre for assistance.

  7. You can set additional optional items on the full event form. Select View event or More details and then select the following options:

    • Select Busy to choose how your status will appear during the event, or to make the event private.

    • Select Categorize to choose a category for the event.

    • Select Response options to choose if you want to request responses from attendees, allow the meeting request to be forwarded, or hide the attendee list.

    • Select Optional to add optional attendees.

    • Select Repeat to make this a recurring event, and then choose the dates when you want the series to begin and end.

    • Select Remind me to choose when you want to be reminded about the event. By default, the reminder time is set to 15 minutes before the event.

  8. Select Save if this is an appointment you created for yourself or Send if this is a meeting with attendees.


Tip

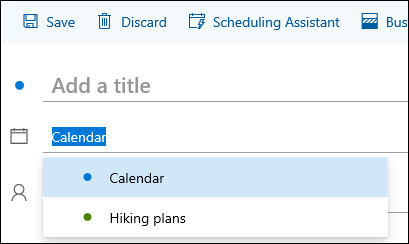
Note: If you own more than one calendar, you can choose which calendar to create an event in by selecting it from the drop-down list at the top of the new event window. 

A screenshot of the calendar name in the event details form


Horizontal Navigation Bar Page
titleModify
classtab-button-content

Modify a meeting or appointment

  1. At the bottom of the page, select Calendar .

  2. Select the event you want to modify and then select Edit.

    If this is a recurring meeting or appointment, you will also have to choose one of the following:

    • This event: Choose this option to open and make changes to the event you've selected in the calendar.

    • This and all following events: Choose this option to delete the event you've selected in the calendar and all subsequent events in the series.

    • All events in the series: Choose this option to open and make changes to the complete series of events.

  3. Change any details for the event, and then select Save if this is an appointment you created for yourself or Send if this is a meeting with attendees.


Horizontal Navigation Bar Page
titleCancel or delete
classtab-button-content

Cancel a meeting or delete an appointment

  1. At the bottom of the page, select Calendar .

  2. Select the event in your calendar.

  3. Select Cancel if the event is a meeting, or Delete if the event is an appointment. If you're canceling a meeting, add a message if you want, and select Send.

    If this is a recurring event, you will have to select one of these options when you first select Cancel or Delete:

    • This event: Choose this option to cancel or delete the event you've selected in the calendar.

    • This and all following events: Choose this option to cancel or delete the event you've selected in the calendar and all subsequent events in the series.

    • All events in the series: Choose this option to cancel or delete the complete series of events.


Tip

Note: For information and instructions on how to create, share and work with multiple calendars, see "Advanced Features" below. 


Expand
titleContacts


Horizontal Navigation Bar
titleClick for more information.
classtab-header


Horizontal Navigation Bar Page
titleCreate a new contact
classtab-button-content

Add a new contact from scratch

  1. Select the People icon People at the bottom of the navigation pane.

  2. On the People page, on the toolbar, select New contact.

    A screenshot of the New contact button

  3. Enter details for the contact. Select Add more to add more information, such as the contact's address and birthday.

  4. Select Create.


Horizontal Navigation Bar Page
titleView and edit
classtab-button-content

View and edit contact information

  1. On the People page, select a contact in the middle pane to see or edit information about them. What you see is a version of the profile card. What tabs and sections you see may vary.

    • Files: Recent files that the contact has shared with you.

    • Email: Recent email messages and email attachments between you and the contact.

    • LinkedIn: If the contact has a public LinkedIn profile with the same email that you've saved for that contact, you'll see LinkedIn information here.

  2. To edit a contact, select Edit contact next to Contact Information, or select Edit on the toolbar.
    A screenshot of the Edit contact button


Horizontal Navigation Bar Page
titleDelete
classtab-button-content

Delete a contact

  1. Select one or more contacts, and then select Delete.

  2. Select Delete to confirm.


Tip

Note: For additional tips and instructions on managing contacts, see "Advanced Features" below. 


Expand
titleTasks


Horizontal Navigation Bar
titleClick for more information.
classtab-header


Horizontal Navigation Bar Page
titleManage your tasks
classtab-button-content

Manage your tasks

  1. To view and manage your tasks, select Tasks icon To Do at the bottom of the navigation pane.
    Go to tasks

  2. The To Do page includes four default tasks lists, plus optional tasks lists and any tasks lists that you create.
    • My Day is a Smart List that can help you track the tasks that you want to get done today. It's empty at the start of each day by default, so that you can organize your day by adding tasks to it. You add existing tasks to My Day by right-clicking a task and choosing Add to My Day, or by dragging a task from any other tasks list to My Day. Tasks that appear in My Day are kept in their original list.

      Tip

      Note: My Day is cleared at midnight every night. Tasks that appear in My Day are stored in other tasks lists, so they aren't deleted when My Day is cleared.


    • Suggestions are tasks that aren't completed that you might want to add to My Day. To see suggested tasks, go to My Day, then select Light bulb icon Suggestions at the top of the page. Select the plus sign (+) next to a task to add it to My Day. Select Done to close Suggestions and return to My Day. Suggestions includes tasks that are due today or in the future, are overdue, were previously moved to My Day but not completed, or that might be relevant to start working on.

    • Important is a Smart List that includes tasks that you've marked as important. You can mark a task as important by right-clicking it and selecting Mark as important, or by selecting the star icon next to it.
    • Planned is a Smart List that includes tasks that have a reminder or due date and have not been marked as complete. Tasks that you create with a reminder or due date will automatically appear in this list. The only way to add tasks to this list is to assign a reminder or due date to an existing task.
    • Tasks is the list where new tasks are stored by default.
    • Flagged Email is an optional list. When on, messages that you've flagged in Mail are copied to the Flagged Email list as tasks. You can turn the Flagged Email list on or off by going to To Do, then selecting Windows 10 gear button Settings > To Do Settings at the top of the page, going to Connections and using the slider to turn the Flagged Email list on or off.

  3. Assigned to Me is another optional list. When on, items that have been assigned to you in Microsoft Planner will appear in Assigned to Me. To turn Assigned to me on or off, go to To Do and select Windows 10 gear button Settings > To Do Settings at the top of the page, go to Connections and use the slider to turn Tasks from Planner on or off. You can learn more at See Planner tasks in Microsoft To Do.

  4. You can add new tasks by selecting a tasks list, then choosing the plus sign next to Add a task and entering a description of your task. If you add a task to a Smart List, the task will be saved in Tasks and linked to the Smart List you were in when you created it.

    Tip

    Note: You can't create new tasks in Planned. To add a task to Planned, add a reminder or due date to an existing or new task.


  5. Select a task in any list to see all of the available options for that task. You can do things like add additional steps, add them to My Day, make them repeating, add a due date or reminder, and add a note.


Horizontal Navigation Bar Page
titleAttach a file to a task
classtab-button-content

Attach a file to a task

You can add one or more files to a task.

  1. Select Tasks icon To Do at the bottom of the navigation pane.

  2. Select the task you want to add a file to.

  3. Choose Add a file from the task details pane.

  4. Browse to and select the file you want to add.

Tip
iconfalse

Note: You can attach more than one file to a task, but can add them only one at a time.


Horizontal Navigation Bar Page
titleCreate a task from a message
classtab-button-content

Use the My Day pane to create a task from a message.

Note: The My Day pane is a new feature that might not yet be available in your account.

  1. Go to Mail .

  2. Open the My Day pane by selecting My Day icon My Day on the toolbar at the top of the page.

    Task icon in toolbar
  3. Find the message that you want to create a task from in the message list.

  4. Select and drag the message to the To Do tab in the My Day pane.


Horizontal Navigation Bar Page
titleDrag a task to your calendar
classtab-button-content

Drag a task to add it to your calendar

Use the My Day pane to create an event in your calendar from a task.

Note: The My Day pane is a new feature that might not yet be available in your account.

  1. Go to Calendar .

  2. Open the My Day pane by selecting My Day icon My Day on the toolbar at the top of the page.

    Task icon in toolbar
  3. Find the task that you want to create a calendar event from.

  4. Select and drag the task from My Day to when you want it on your calendar.


Horizontal Navigation Bar Page
titleTasks lists
classtab-button-content

Creating and managing tasks lists

In addition to the default tasks lists, you can create and manage lists to organize your tasks into.

  1. Create a new tasks list.

    1. Select New list in the navigation pane.

      Create new Tasks list
    2. Enter a name for your new list.

    3. Press Enter to save your new list.

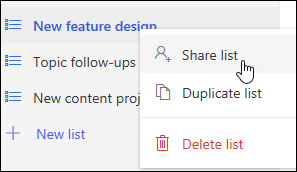
  2. Right-click a list in the navigation pane to Share, Duplicate, or Delete it.

    Share tasks list

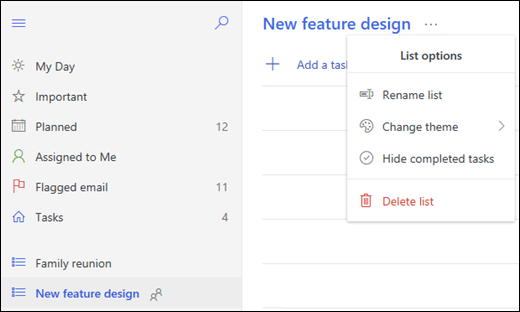
  3. Select a list, then select the more actions More actions icon in the task window to access list options such as Rename list, Change theme, or Hide completed tasks.

    List options


Anchor
advanced
advanced

Expand
titleAdvanced features

Email:

Horizontal Navigation Bar
titleClick for more information.
classtab-header


Horizontal Navigation Bar Page
titleCompose or Reply
classtab-button-content


Horizontal Navigation Bar Page
titleCustomize Settings
classtab-button-content


Horizontal Navigation Bar Page
titleOrganize
classtab-button-content


Calendar:

Panel
bgColor#fAFAFA


Microsoft Windows:

Windows Outlook Web Mail cheat sheet

Windows Outlook Web Calendar cheat sheet


Tip
iconfalse

(question) Need More Help?

Contact the IT Service Desk:

Button Hyperlink
titleSubmit a Ticket
typestandard
urlhttps://jira.selkirk.ca/plugins/servlet/theme/portal/1
or call 55255 from a college phone


Info
iconfalse
titleRelated Articles:

Content by Label
showLabelsfalse
showSpacefalse
sorttitle
excludeCurrenttrue
cqllabel = "student"


CSS Stylesheet
.tab-button-content{
background-color: #fAFAFA;
}
.tab-header{
background-color: #e6f2ff;
}


You are evaluating Refined.