Need More Help?

For IT support, visit the IT Service Centre or dial 55255 from a College phone.


Versions Compared

Key

  • This line was added.
  • This line was removed.
  • Formatting was changed.
Comment: Replaced TOC with Expand macro to allow visibility when viewed via SD.


Table of Contents

Overview

This guide will assist supervisors in navigating the U4R Hiring Manager portal where you will post jobs, review candidates & set up interviews. Before starting, check out the Hiring Manager Checklist


Expand
titleHiring Manager Dashboard
1. 
  1. When creating postings and working with Unit4 Recruit please use the preferred browser of Google Chrome, Firefox will also work well.
2. 

  1. Login to your Unit4 Recruit Dashboard (u4r.selkirk.ca), using your Selkirk College email address.
3. 

  1. Welcome to your Hiring Manager Dashboard. Here is where you will post jobs, review candidates, set up interviews and much more.
4. 

  1. Click “Start Tour” at the top left to check everything out!

    Image Modified
info


Preparing a Job Posting

1. 
Expand
iconfalse
titleRelated Articles:

Content by Label
showLabelsfalse
showSpacefalse
cqllabel in ("postings","hiring_manager") and space = currentSpace()

titlePreparing a Job Posting
  1. There are two ways to create a new job posting.  Both options will take you to the “Create Job” page (see "Posting Details").
    • Option 1:  From the dashboard click on “Add New Posting”.
      Image Modified

    • Option 2:  Click on “Postings” at the top right of your screen. This takes you to a page called “Postings”. From here, you can see all the job postings you have created.
      i.  Click on “Create posting

Image Modified


Expand
titlePosting Details
1. 
  1. Here you will complete all of the required information within the “Posting Details” Tab.

NOTE:  All items marked * are mandatory

Image Modified

  • Posting/Closing Dates: These will be entered by the recruiter
  • Posting Title: This is where you enter the Position Title
  • Hiring Manager: This will default to the person creating the posting, leave as is unless you are doing a posting for someone else
  • Do not post to careers site: Check box if you do not want to posting to show on the careers site or anywhere
  • Number of openings: This is where you can identify how many openings for this position
  • Application Form: This is the form that is used when applying online, choose from the drop-down list
  • Prevent Candidate from re-applying: Prevents duplicate applications if a posting is reopened, a candidate can only apply one time regardless of whether this is checked


Expand
titlePosting Classifications
1. 
  1. Once you have entered the information on the “Posting Details” screen, click on the “Classifications” tab.
2. 

  1. There are different tabs along the top of the screen, as well as the left hand side that you will need to click on to enter the full job details.
    • First, you will start on “Appointment Details”.
      Image Modified
3.

  1. Next click on “Dates” tab to enter the desired start date, and end date (if applicable); click on the calendar button to pull up dates or type in the date manually.
    Image Modified
4. 

  1. Next click on “Recruitment Details” the Recruitment and HR Team will need to know the reason for posting as well as how and where you would like your position to be posted/why it is being posted.
    • Click on the arrows to use the drop down menu, remembering that the chosen option will dictate the connected drop down options.
      Image Modified
5.  

  1. Next click on “Campus Details” this will prompt you to remind the campus manager of the new posting and whether or not a workstation is required. If a workstation is not required, please indicate reasoning under “Additional Details”.
    Image Modified
6. 

  1. Next click the “Posting Text” tab.


Expand
titlePosting Text
1. 
  1. The first tab to open is the “Posting Summary” this is the page where you will enter the introductory paragraph, this is what will show as a summary on the careers page. This should be very short and to the point, it will be the first thing seen for the posting.

    For existing positions, access the job posting repository on the drive located at: S:/HR/Postings Repository navigate to the appropriate union folder
 and
  1.  and choose the most up to date version. 
    Image Modified
2. 

  1. Next click “Posting Description” this is where you include:
    • Main Duties and Responsibilities
    • Skills, Knowledge and Abilities
    • Education and Experience
    • Duration, FTE, Salary, etc.
    • Desired Posting/Closing Date
      NOTE: Please specify the date you would like the posting to go Live and the date to close. All postings must be up a minimum of 7 days.
3.

  1. Using the most up-to-date Job Posting, simply Copy (ctrl + c) and Paste (ctrl +v) the description into this section.
    • Look for the most up to date job posting in the “Posting Repository” Located: S:DRIVE/HR/Posting Repository
    • Make sure you include the the portion at the bottom that includes the duration, salary, FTE, etc.. (Do not include the generic Selkirk message as this is automatically entered when posted).
    • If you would also like the most recent Job Description please email HR@Selkirk.ca.
      Image Modified


Expand
titleSaving A Posting
1. 
  1. Now that all of the required parts for a posting have been completed, choose save on the top right.
    Image Modified
2. 

  1. After clicking “Save” you will receive this message, notifying you that the posting is still in draft. Click “OK” to continue.
  1. Image Modified
3. 

  1. After saving you will be redirected to the draft of the posting, from here you can make further edits if needed.
  1. Image Modified

    • If you leave this page, you can access your drafts by clicking “Postings” and choosing “View Posting details” on the posting you would like to continue working on.
      Image Modified


Expand
titleAdding A Hiring Committee
1. 
  1. After your posting has been saved, click on "Options" in the top right and chooseHiring Committee Selection.
    Image Modified
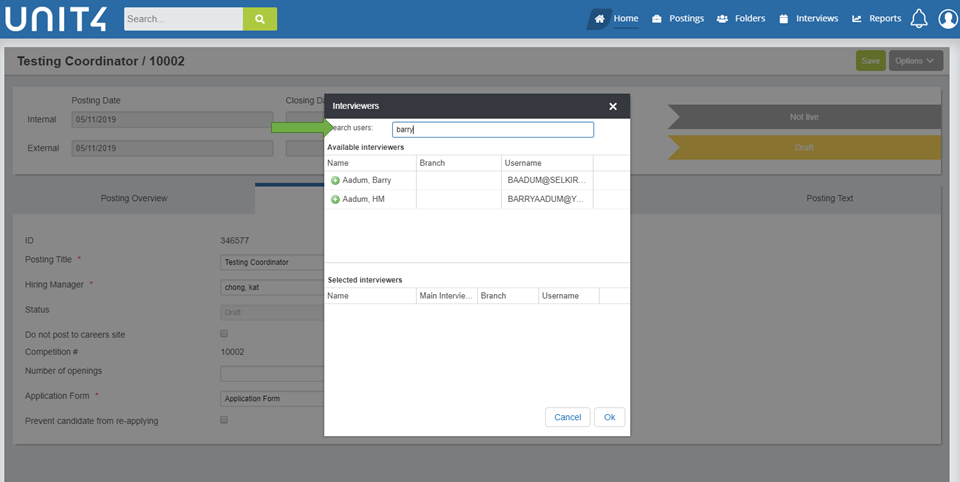
2. 

  1. A pop up will show where you can search available users, if the person you are looking for does not show up, please email careers@selkirk.ca to have an account created for them and to be added to your folder.
    Image Modified
3. 

  1. Press the Image Modified to add the selected interviewer.
    Image Modified
4.  

  1. When complete, press “OK”.


Expand
titleAdding Assessment Criteria

What is Assessment Criteria?
Assessment Criteria is where you will enter the criteria you want to use to rate candidates. You must have a minimum of 3 criteria and max of 10.

1. 


  1. To add new criteria, go into your job posting by clicking on “Postings”, then “View Posting Details”.
    Image Modified
2.  

  1. Click on “Options” then select “Assessment Criteria”.
    Image Modified
3.  

  1. This will take you to the "Manage Assessment Job Criteria" page. Here you can manage/edit the job criteria.
4. 
  1. Click the Image Modified button on the left side of your screen. This will create a new, blank criteria.
  1. Image Modified
A.

    1. Criteria Title: Using the drop-down menu, select your criteria.
      *
 NOTE
    1. NOTE: If the criteria you want is not available, choose the closest and email careers@selkirk.ca to request the criteria be added.
B.

    1. Stage: There are 2 options listed - CHOOSE "APPLICATION" FOR YOUR CRITERIA.
    i. 
        1. Application: This is what will be used to assess each resume received.
    ii.
        1. Interview: We are currently not using this stage, please do not select this for your criteria.
    C.

      1. Assessment Score Basis: Using the drop-down menu;
      i.  
          1. Rating 0 to 3/User Defined: This rates on a table how much they meet the criteria from 0 – 5 (0 being not at all).
      ii.
          1. Met/Not Met: If the assessment can be "Met" or "Not"(ex. Hold a valid driver’s license)
      D.

        1. Essential/Desirable: Using the drop-down menu, choose whether the criteria is an "Essential" or "Desirable".
      E.

        1. Sequence: If you require your Criteria to be shown in a particular order, use this option. Number them in the order you’d like them to appear.
          *
       NOTE
        1. NOTE: This is an optional feature. If not selected, it will list criteria in the order shown.
      5.  

      1. Once Steps A-D have been completed, your screen will automatically refresh and save.
        *
       NOTE
      1. NOTE: Steps A-D must be entered in order for the criteria to save. As you complete each line it will automatically save, be sure to enter all information to save.
      6. 

      1. The "Assessment Criteria"will look like below once complete.
        Image Modified
      7.  
      1. Once you are satisfied with your list of Criteria, click “Back to Job Details”. This brings you back to your “Posting Details” page:Image Added


      Expand
      Image Removed
      titleSubmitting Your Posting For Approval
      1. 
      1. From your “Posting Details” page; Click “Options” then hover over “Workflows”.
        1. Select “Submit Posting for Approval”. This will send the draft to HR for approval.
          Image Modified
      2. 

      1. You will receive a warning saying “Are you sure you want to do this?
        1. Choose “Yes” to send to HR for Approval.
        2. Choose “No” if you would like to go back and edit the posting before sending for approval.
      3. 

      1. Once your posting has been submitted, you will see the “Workflow Run Status” page.
        Image Modified
      4. 
      1. From here, you can choose to review your posting by clicking “Go to Job Details”.
      5.  
      1. If you were not ready to submit for approval, you can choose to “Terminate Workflow”.


      Expand
      titleTerminating A Workflow
      1. 
      1. If you made an error in submitting a posting, you can terminate the workflow by clicking on the top right button “Terminate Workflow”.
        Image Modified
      2. 

      1. A confirmation pop-up will appear. Choose “Yes” or “No”.

        Image Modified
      i. 

        1. If you chose “No”, it will take you back to the previous screen “Workflow Run Status”.
      ii.
        1. If you chose “Yes”; it will terminate the workflow and you will see the screen below.
          Image Modified
      3.  

      1. From here, you can click “Go to Job Details” and make your changes before submitting for approval again.


      Expand
      titlePosting Approval
      1. 
      1. Once your posting has been reviewed and approved by Human Resources, you will receive an email confirmation.
        Image Modified
      2.  

      1. You can now login and see the candidates who have applied. You can also view your posting at selkirk.ca.


      Info
      iconfalse
      titleRelated Articles:

      Content by Label
      showLabelsfalse
      showSpacefalse
      cqllabel in ("postings","hiring_manager") and space = currentSpace()


      You are evaluating Refined.