Page History
| Expand | |
|---|---|
|
| ||
1. Login to your Unit4 Recruit Dashboard (u4r.selkirk.ca) 2. You will need to identify which candidates you want for an interview.
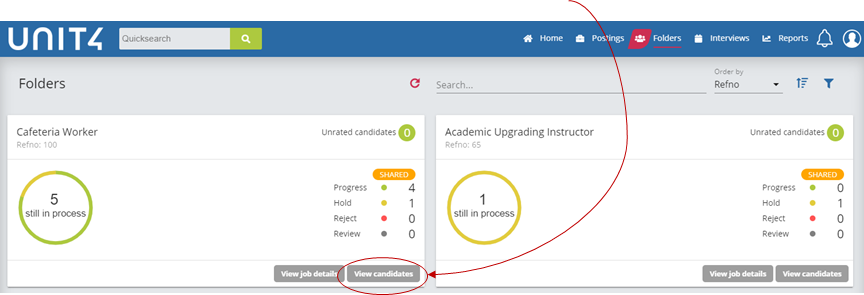
3. To select your candidates, click on the “Folders” tab.
4. Choose the folder that you want to set-up interviews for, click “View Candidates”.
5. To select multiple candidates, click the boxes on the left-hand side. Selecting the ones you would like to move forward with. 6. Then click “Options” > “Progress” > “Shortlisted for Interview”.
7. You will now have a pop-up asking you to confirm. Click “OK”. This will update the status to “T072 – Shortlisted for Interview” and add them to the interview.
|


| Expand | ||
|---|---|---|
| ||
8. Now click on the “Interviews” tab.
9. This will bring you to the ‘My Interviews’ page. Click “View My Schedules” To create a new interview request.
10. This will bring you to a page with all of your postings. Click the “Edit” button on the right hand side of the posting you are setting up
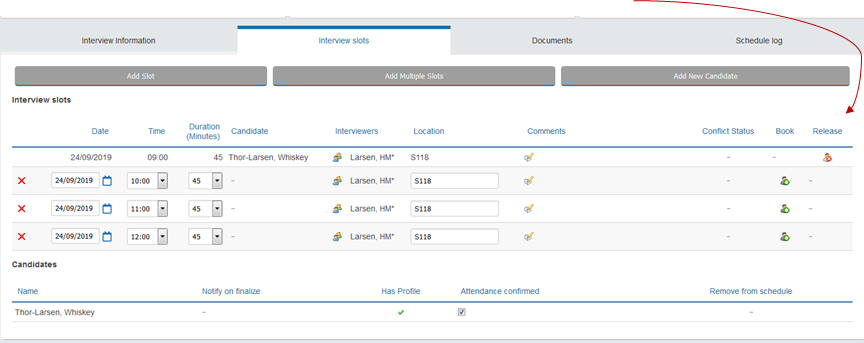
11. This brings you to the ‘Interview Schedule’ page. Here you can see the candidates that have been added. 12. There are three different tabs, we will only use the “Interview Slots” tab.
13. There are two ways you can add ‘Interview Slot’ availability. You can do one slot at a time, or multiple.
|


| Expand |
|---|
|
| |
13.A. Adding One Interview Slot at a Time: i. Click “Add Slot”. This will populate a single line. Complete the date, time and duration ii. Under Location, use this to notify to the candidate which campus the interview will take place at. iii. Under Comments, this is where you can leave a specific note for the candidate. iv. Once details are complete, click “Save”
v. Adding multiple slots allows you to indicate the Hiring Committee’s availability for interviews. Click “Add Multiple Slots”. * NOTE: This page does NOT book rooms. Please use the Room Booking system to find a room based on availability* |

| Expand | ||
|---|---|---|
| ||
13.B. Adding Multiple Interview Slots at Once: i. Select the date & time you want the interviews to start. ii. Choose whether you want to ‘Enter Manual’ or ‘Use End Time’. * Enter Manual: Manually sets interview slots based on the information you input. * Use End Time: Allows you to set start/end times, the duration of interviews and if you’d like a break in between. iii. If you want candidates to receive interview questions, presentation information or any other requests, enter this into ‘Standard Comments’. iv. For 'Campus location', be as specific as you can. If you already have a room booked, please enter it here. v. When satisfied with the availability that has been set up, click “Save” in the top right.
14. You will now be back to your ‘Interview Schedule’. You should now see the slots available for candidates to book. 15. The Candidates that will be invited to interview are shown at the bottom of the screen under ‘Candidates’. 16. If there is a candidate that you rated but is not showing up in this list, click on “Add New Candidate”.
17. To add multiple candidates from the pool, check the box next to their name.
18. Click “Save”. This will take you back to your Interviews home page. 19. If you have added candidates that you didn’t mean to, you can quickly remove them from the home page by clicking on the icon under “Remove from Schedule".
20. A pop up will ask if you are sure, click “OK” to remove or “Cancel” to go back.
21. Check with HR to confirm booking & room details prior to finalizing. 22. Once confirmed and you are satisfied with the schedule, click “Finalize” to send interview requests to the selected candidates.
23. You will see a pop-up, asking you to confirm:
24. Click “Yes” if you are sure. 25. Candidates will receive an email directing them to the Hiring Portal. There they will see the slots available for them to book.
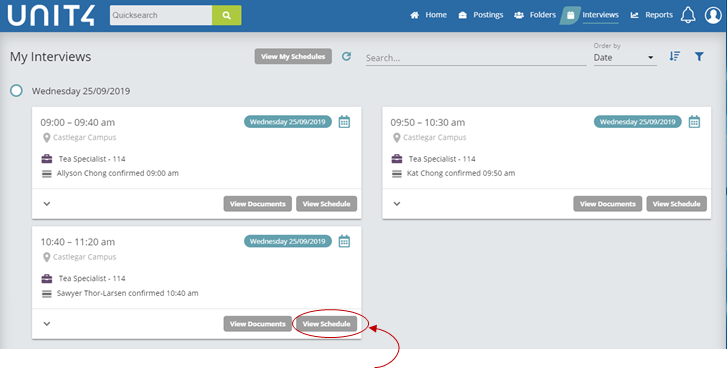
26. Once candidates have booked interviews, you will be able to see them in the ‘Interviews’ page.
27. The ‘My Interviews’ page can show you who has confirmed their interviews, for which posting and at which time.
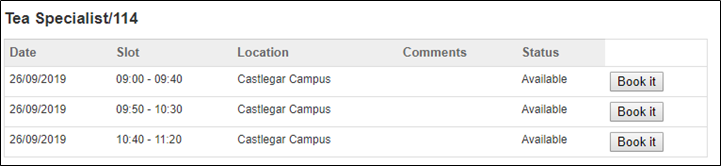
28. Click “View Schedule” to see the full interview schedule. 29. Here you can see the full schedule; which slots are confirmed and which ones are remaining.
|


| Expand | ||
|---|---|---|
| ||
1. Applicants can easily withdraw from their Candidate Portal. If this happens, the applicant will disappear from your schedule and U4R will re-open the slot they cancelled. 2. If they email to cancel, the Hiring Manager or recruiter can remove them by releasing the time slot.
|
| Info | ||||||||
|---|---|---|---|---|---|---|---|---|
| ||||||||
|